Chalk

color.js曾经是最流行的字符串样式模块,但它存在严重的缺陷,例如扩展,String.prototype导致各种问题,并且该包无人维护。尽管还有其他包,但它们要么做得太多,要么做得不够。chalk是一种干净、专注的替代品。
Install
npm install chalk
警告
IMPORTANT: Chalk 5 完全使用 ESM 方案,如果想在纯 typescript 环境或构建工具中使用 Chalk ,可能需要使用 Chalk 4
不过目前 ts 已经支持把项目的打包格式更新成 ESM 方案了,虽然比较激进
通过配置ts.config.json
    "compilerOptions": {
        "module": "NodeNext",
        "moduleResolution": "NodeNext",
    },
5 的升级
- Bundle dependencies
Chalk不再依赖其他第三方库 🎉
这里似乎是 esm 化后,可以直接把捆绑依赖放到项目下,而不用打成包
这里跟 npm 的 BundleDependcies 微前端 没有关系
- 安装体积比
Chalk 4的一半还小
.....
常用语法
import chalk from "chalk";
const log = console.log;
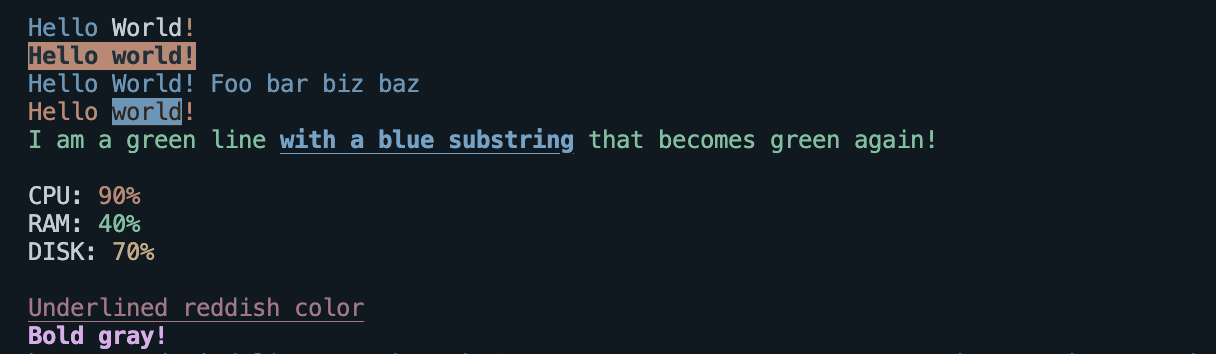
// Combine styled and normal strings
log(chalk.blue("Hello") + " World" + chalk.red("!"));
// Compose multiple styles using the chainable API
// 这种情况 bgRed 优先级大于 blue
log(chalk.blue.bgRed.bold("Hello world!"));
// Pass in multiple arguments
log(chalk.blue("Hello", "World!", "Foo", "bar", "biz", "baz"));
// Nest styles
// 这种情况 bgBlue 优先级大于red
log(chalk.red("Hello", chalk.underline.bgBlue("world") + "!"));
// Nest styles of the same type even (color, underline, background)
log(
chalk.green(
"I am a green line " +
chalk.blue.underline.bold("with a blue substring") +
" that becomes green again!"
)
);
// ES2015 template literal
log(`
CPU: ${chalk.red("90%")}
RAM: ${chalk.green("40%")}
DISK: ${chalk.yellow("70%")}
`);
// Use RGB colors in terminal emulators that support it.
log(chalk.rgb(123, 45, 67).underline("Underlined reddish color"));
log(chalk.hex("#DEADED").bold("Bold gray!"));
// 自定义主题
const error = chalk.bold.red;
const warning = chalk.hex("#FFA500"); // Orange color
console.log(error("Error!"));
console.log(warning("Warning!"));
// 支持 format 占位
const name = "Sindre";
console.log(chalk.green("Hello %s"), name);
//=> 'Hello Sindre'
如何支持链式调用
思想:链中每一个节点存有 openAll 和 closeAll,保证父节点信息不丢失,
All 字段要不断和子节点的 style 拼接
https://github.com/chalk/chalk/blob/main/source/index.js
// 源码,只保留关键部分
const createStyler = (open, close, parent) => {
  let openAll;
  let closeAll;
  if (parent === undefined) {
    openAll = open;
    closeAll = close;
  } else {
    // 但是子节点有优先级更高的样式怎么办?ansi-styles的规则已经解决了这个问题了
    openAll = parent.openAll + open;
    closeAll = close + parent.closeAll;
  }
  //存储父节点, 那么父节点从哪来呢?往后看
  return {
    open,
    close,
    openAll,
    closeAll,
    parent,
  };
};

const createBuilder = (self, _styler, _isEmpty) => {
  // 高阶函数
  const builder = (...arguments_) =>
    applyStyle(
      builder,
      arguments_.length === 1 ? "" + arguments_[0] : arguments_.join(" ")
    );

  // We alter the prototype because we must return a function, but there is
  // no way to create a function with a different prototype
  Object.setPrototypeOf(builder, proto);

  builder[GENERATOR] = self;
  builder[STYLER] = _styler;
  builder[IS_EMPTY] = _isEmpty;

  return builder;
};

// 最终我们应用每一个实例的openAll和closeAll
const applyStyle = (self, string) => {
  if (self.level <= 0 || !string) {
    return self[IS_EMPTY] ? "" : string;
  }

  let styler = self[STYLER];

  if (styler === undefined) {
    return string;
  }

  const { openAll, closeAll } = styler;
  return openAll + string + closeAll;
};

export class Chalk {
  constructor(options) {
    // eslint-disable-next-line no-constructor-return
    return chalkFactory(options);
  }
}

const chalkFactory = (options) => {
  // 实现传递多个实例,每个实例互不干扰
  const chalk = (...strings) => strings.join(" ");
  return chalk;
};

function createChalk(options) {
  return chalkFactory(options);
}

// 这里很关键,在各种样式,如"red"的 get 上做处理,
// 返回的不再是样式,而是对样式信息封装一层的 builder,
// 在封装的过程中,通过 this[STYLER]拿到父builder的styler
// 从而 createStyler 可以保证父节点信息不丢失
for (const [styleName, style] of Object.entries(ansiStyles)) {
  styles[styleName] = {
    get() {
      // 为什么用this,还记得我们是通过联式调用的吗
      const builder = createBuilder(
        this,
        createStyler(style.open, style.close, this[STYLER]),
        this[IS_EMPTY]
      );
      Object.defineProperty(this, styleName, { value: builder });
      return builder;
    },
  };
}